Now that I am done with student teaching and can stay at home with my baby girl and take care of her: I have time to do more projects. I have tons of them lined up for me to do.
I saw these adorable, and functional chalk boards all of pinterest that people were making. I decided that a nice big chalk board is what I should make. *Functional decorations are what makes a house a home. They just look nice and a homey because you are actually using them.
I was on the prowl for a nice big picture I could make a chalk board out of. One day while searching at the local thrift stores I came across this nice big frame. It was $10.00.

Then I went and bought chalk paint. I just went to Wal-Mart. It was around $2.00.
Here are the steps I took to create my chalk board.
1. After I bought the frame I cleaned it really well to make sure there was not any dust left on it. If you do not clean it well you are liable for getting bubbles in your paint or areas that look rough. I just got a paper towel damp and wiped it down. Even if you think your board is clean I would recommend that you still wipe it down just incase you could not see some dirt.

2. I let the water dry, it did not take longer then a couple seconds.
3. I got my brush ready, I used about a 2inch brush. Then I just drizzled some paint on part of my board to start painting it. I did this by sections until it was all covered. I did not even do a very thick coat. Once I got to the sides, I just angles my brush and slowly went in the sides. Some people might prefer using tape to protect the side.


4. As I waited for this to dry I just got a paper towel and made it damp and then wrapped it around my brush where the wet paint was. This will help your brush not harden up. I waited for about 12 hours before I painted my second coat. The bottle of paint said that you could paint the second coat with-in an hour, but I could still see a wet part.

5. Then I repeated step 3. I did a thicker coat along the sides just to make sure I would not have to do a third coat on it. For me two pretty thin coats did the trick.

6. I let this sit and dry for atleast 36 hours before I started conditioning it. To condition it you just take a piece of chalk and rub it all over the board vertically and horizontally. This makes sure the calk gets into every little knick and cranny before you start writing on it. If you do not do this where ever you write it will leave residue that will stand out. So your first message could be on the board forever. But once you condition it you can write on it with no problems.

This was a spot from where I had put a big paint blot so that I could dip
my brush into it while I painted the edges. This is a great example of why
you need to condition your chalk board.


It kind of wears your chalk down, but it is so worth it!
7. After you have chalk all over rubbed in really good then you take a damp wash cloth, a soft one so it does not scratch your paint, and just wash off the chalk. I used one of my baby girls was cloth because they are super soft!

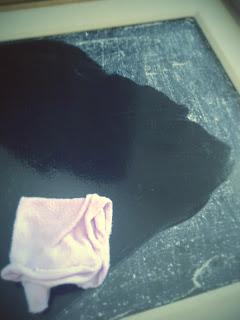
After you wash everything off you will not be able
to see any of the spots that your chalk found.
8. After your chalk board dries you are good to go! "Chalk" whatever you would like on it! I am going use mine for sweet message between my hubby and I, and Amelia when she gets older, for verses that I want to remember or that are just good ones to have in my home, events I need to remember, encouraging words really just anything!

I have my chalk board in my kitchen, I have this wall in the kitchen
where everybody walks through everyday so it is the perfect spot for it!

Amelia wanted in on the action! Sweet girl!
My very first "chalking" I wrote, "Welcome Home Honey Bear. Where 2 or 3 are gathered in His name He is there" so this utilized a sweet message and a great verse from the Bible. I also did a fun boarder around the edges.

"Chalking" is so much fun because it is your to do whatever you want to. Your message does not have to be perfect! Part of the beauty of "chalking" is that it isn't supposed to be perfect, it is just fun, and a great resource for your home to utilize.
I would love to see some of the cahlk boards you have made, and some of the "chalkings" you have done. Please post your pictures or just tell me in my comments on this blog, or tag me on facebook, instagram, twitter, or pinterest! I can not wait to see what you all have done!
Also, I am now on Bloglovin'!
No comments:
Post a Comment